Koridor içermeyen bir çizimde herhangi bir arazi modelini koridor kesit editöründe görüntülemek için aşağıdaki yöntemi izleyebilirsiniz:
1- Yatay güzergahınızı oluşturun.
2- Arazi profilini oluşturun.
3- Araç paletinin Assemblies paletinde yer alan Null Assembly isimli boş tip kesiti çizime yerleştirin.
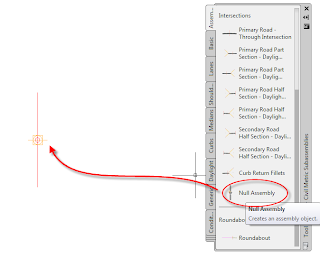
Yukarıda tanımladığınız yatay güzergah, arazi profili ve boş tip kesit ile koridor oluşturun.
Bu şekilde boş tip kesit ile oluşturulan koridor çizimde görüntülenmeyecektir. Toolspace'in Prospector sekmesinde oluşan koridor ismi üzerinde sağ tuş yaparak kesit editörünü açabilirsiniz.
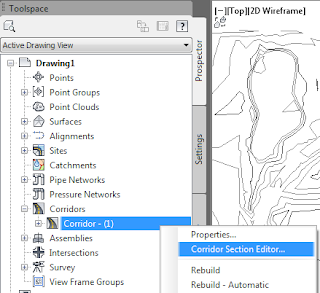
Kesit editöründe arazi modelinin gözükmesi için Zoom ve Pan yapmanız gerekebilir. Uygun bir bakış ayarı yaptıktan sonra kesit editörünün View Tools panelinden Zoom to an Offset and Elevation seçeneğini seçerek yaptığınız bakış ayarını diğer kilometreler içinde koruyabilirsiniz.
Bu şekilde çizimde yer alan arazi modellerini boş bir tip kesit kullanarak oluşturduğunuz koridorun kesit editöründe görüntüleyebilirsiniz.

1 Ekim 2013
Volume Between Three Surfaces
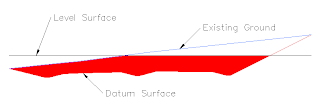
If you have three surfaces like the example below and you want to get the red cut area, instead of following these three steps:
1-Calculating the cut between Existing Ground and the Datum Surface,
2-Calculating the cut between Existing Ground and the Level Surface,
3-Subtracting Existing Ground-Level Surface cut from Existing Ground-Datum Surface in Excel...
It is possible to get the related cut area at just one step!
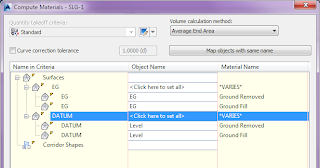
First, create a material list for the Existing Ground and Level Surface.
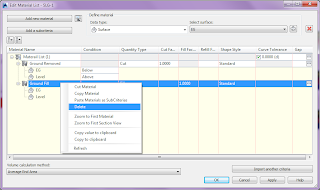
Since we are concerned with cut area only, we can delete Ground Fill by running Delete from the right click options.
Here the trick starts:
First change the Condition column of the Level Surface from Above to "Below".
After highlighting the Ground Removed line, select the remaining surface - in this case datum surface of the corridor - from the surface list and press the plus sign next to it.
The Datum Surface will be added as the third surface on the existing material list. The Condition column of the Datum Surface should remain as "Above".
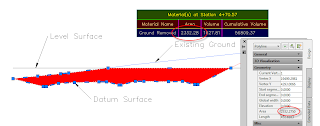
And that's it! When you press OK, you will see that the cut area you want between these three surfaces is defined correctly.
You can add your volume table.
Just to make sure that the calculated area is correct, draw a closed polyline for the related area. You will see that the area of the polyline is the same with the area calculated by the Compute Materials command.
You can use this method for more than three surfaces.
Kaydol:
Kayıtlar (Atom)